Showing posts with label Favorite. Show all posts

Thursday, August 10, 2017

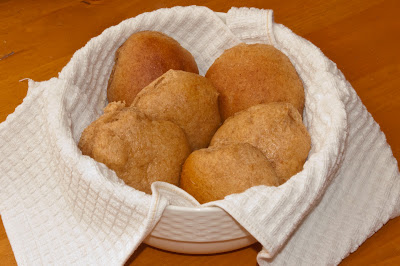
Favorite Recipes Daily Delicious Whole Wheat Bread


We absolutely devour this delicious recipe from HomeWithPurpose.blogspot.com and after trying a few different bread recipes that I found elsewhere prior to this one, this recipe instantly became a family favorite - we LOVE it!  We make this recipe to have with our Green Smoothies in the mornings for breakfast.  Oh...my...goodness - YUM.  (Have I said that already? *laugh!*) These rolls don't even need butter!  And they're so good for us!  100% whole wheat, yet still chewy and yummy!

The author of Home With Purpose, Kara gives great step-by-step directions with photos in her post, Bread Baking with Fresh Ground Flour 101.  She does not, however, list the ingredients in a list by themselves (they're listed through out the recipe post), or break the recipe down in to smaller ones, so I've done that for myself and for you here.  *smile*

I encourage you to go to her blog to see all of her great photos if you're a newbie bread-maker like me.  *wink*  I broke down her giant recipe (7 loaves) in to a half recipe, and a quarter recipe which we used when we were initially making the recipe by hand.  Then we got to purchase (used, off of Craig's List!) a 6 quart Kitchen Aid stand mixer which can do the entire 7-loaf recipe worth of dough at once.  Awesome.  So here are all three sizes of Kara's recipe:

Full Recipe (62 rolls or loaves)
  • Hot water, 6 c.
  • Coconut oil (I use olive), 1-1/3 c.
  • Honey, 1-1/2 c.
  • Eggs (optional), 2
  • Salt, 2-2/3 Tbl.
  • Yeast, 4 Tbl.
  • Whole wheat flour (finely ground), 16 c.
  • Flax seed (optional), 2 c.

Half Recipe (30 rolls or loaves)
  • Hot water, 3 c.
  • Coconut oil (I use olive), 1/2 c. + 3 Tbl.
  • Honey, 3/4 c.
  • Eggs (optional), 1
  • Salt, 1 Tbl. + 1 tsp.
  • Yeast, 2 Tbl.
  • Whole wheat flour (finely ground), 8 c.
  • Flax seed (optional), 1 c.

Quarter Recipe (15 rolls or 2 loaves)
  • Hot water, 1 + 1/2 c.
  • Coconut oil (I use olive), 1/3 c.
  • Honey, 1/4 + 1/8 c.
  • Eggs (optional), 1/2
  • Salt, 2 tsp.
  • Yeast, 1 Tbl.
  • Whole wheat flour (finely ground), 4 c.
  • Flax seed (optional), 1/2 c.

Instructions:
  • Preheat oven to 350 degrees.
  • Combine in the mixer the hot water, oil, honey, eggs, salt, and yeast.  (Coconut oil is far better for you, I just haven't purchased any yet, and olive oil tastes great to us *smile*)
  • Add about 12-14 c. flour to the mixer and mix on low speed for about 30 seconds.  Continue adding the flour slowly in about 1/2 c. increments until the dough begins to ball up and "clean" the sides of the bowl.
  • Let mixer knead for about 5 min. (Kara kneads with her mixer 12 min. with a different brand of mixer) while I clean up the kitchen.
  • If the dough seems sticky, let it "rest" for 5 min., if not begin shaping the rolls and/or loaves.  Place on to a greased pan.
  • Tip:  We have found that our rolls rise the most when the dough is first placed in the refrigerator for 20 minutes. I know, doesn't make sense to put it somewhere cold rather than somewhere warm, but we discovered this works best on accident once.  We grease a very large bowl, place the dough inside and then spray some Cling Wrap with non-stick spray as well and cover.  We let it rise in the refrigerator 20 min. and then shape the rolls after that.  The instructions, however, say to allow to rise for 20 min. until they double in size.  You'll have to experiment, I guess, as to which one works best for the climate in which you live.
  • Bake at 350 for 20-25 min.  Tear open one roll to check for doneness.  
  • To make sure the crust stays soft, brush butter on the top of each loaf and roll after they're baked.
  • We leave some rolls out for the next morning's breakfast, but freeze the rest in gallon-size Ziplock baggies to have through out the week.  I set out one baggie each night to thaw for us to enjoy in the morning.  This large recipe serves our family of 11 one roll each daily for a week.
Tips from Karen, our daughter who loves to bake these rolls for us every week -
* Don't grease/butter your hands too much when forming the dough in to balls or the rolls then slide and flatten out more while rising/baking.  If the dough is stickier, they stay rounder better.

* If you pre-measure all of the flour in to a bowl before adding it gradually to the stand mixer then you don't have to try to keep track of how much you're adding as you go along; you can relax knowing that the flour has been measured accurately, all you have to do is add it gradually.


Blessings on your family's health,

You may also enjoy:
Favorite Recipes - Green Smoothies for More Energy and Clarity
Favorite Recipes - Irish Brown Bread
Recipe Organization
Large Family Meal Planning & Shopping

Read More..

Saturday, June 24, 2017

Show Tell Tuesday Favorite Blog Posts


Today I'm excited about the topic of Show & Tell Tuesday...we are sharing our favorite blog posts!
Thanks for the fun link up Andrea! 
I have had fun going back and looking through some of my blog posts.
There are a few I knew I wanted to share.
In no particular order, here are 10 of my favorite blog posts:

{ONE}
I think sharing my most embarrassing moment EVER has to be on this list.
I mean....it was EPIC.
Can you guess what happened......
 I am glad I can laugh about it now. 
Read about it HERE
 
{TWO}
 I loved  my post "Yes, I am one of those Moms"
 I actually got nominated as one of Blogher's Voice of the Year for that post. Crazy!
I wrote about how I am one of "THOSE" moms who likes to make holidays/birthdays/etc special for their kids.

{THREE}
Birth Stories!!! 
I am OBSESSED with birth stories!
We didn't find out what we were having until they were born, so it was extra fun!
 Here are my kids birth stories:
 Kate (HERE)
 Claire (HERE)
 Luke (HERE)


{FOUR}
I am also obsessed with baby names, so here is my post on why we chose our kids names:
Kate & Claire (HERE)
Luke (HERE)

{FIVE}
I think this might be my all time favorite post.
It's called "Relish Your Role"
I wrote it after hearing a sermon at church.
At that time in my life I had A LOT of working mom guilt, so the sermon was perfect timing for me to hear and on that post I wrote from my heart & it felt so good to write about it.

{SIX}
When I confessed that I HATE Pumpkin Spice Latte's. 
Yes, it's true.
I love all things Fall & all things pumpkin except that nasty PSL. 
#sorrynotsorry
You can read about it HERE


{SEVEN}
 I loved writing about How I was the BEST MOM EVER....and then I had kids.
 Read about it HERE
  
{EIGHT}
As you know, I love posting recipes, so here is the most viewed post on my blog "Easiest Dinner Ever"

 This recipe has been viewed almost 2 million times. WHAT?!?!?
And, it is my most controversial post....it is the post I have gotten the most negative comments on. You either love this recipe or you hate it. 
We love it...It's one of my go-to recipes. And, it's the easiest!

Basically, I love my slow cooker & use it at least once a week during the school year.
Here are a few more of my favorites....
Slow Cooker Chicken Fajitas (HERE)


Slow Cooker Broccoli Beef (HERE) 
 Slow Cooker White Chicken Chili (HERE)

And, of course 2 of my FAVORITE cookie recipes:

Sea Salt Chocolate Chip Cookies (HERE)

Best Snickerdoodles Ever (HERE)

In the past 8 years since I started blogging, I have posted over 150 recipes (!!!!)
You can see all my recipes in my Recipe Box tab or click HERE

{NINE}
You know I love throwing parties.
The most "popular" party & most viewed party that I have thrown is Claire's Cowgirl Party.
    I must say, that is probably my favorite party I have thrown also.
It's been almost 5 years since I threw that party and I think there is still some hay in our backyard from all those hay bales....Sorry Kevin ;)

Some of my other favorite parties have been:

Luke's 1st Nautical Birthday Party (HERE)

 Kate's Pizzeria Party (HERE)
I also really loved her Pancakes & Pajamas Party (HERE)


 You can see all my party posts HERE on the party tab!


{TEN}
Anytime I make a free printable, I get excited to share it with you guys!
It's one of my FAVORITE things to blog....I love being creative & sharing ideas with you!
I have  over 30 free printables on my blog.
The most popular downloaded ones have been my Christmas Cookie in a Jar Printable  
A close 2nd to my most downloaded free printable is my Thankful for You Pumpkin Bread Printable:
So, there you have it....some of my favorite blog posts that I have written over the past 8(!!!!) years.


I am sure I missed a few of my favorite posts, but I didn't have time to look through ALL my posts over the years.

Edited to add:
I can't believe I forgot 10 on 10!!

ten on ten button

This is one of my VERY favorite things to blog about.
You take 10 pictures on the 10th of the month
One photo every hour for 10 hours:
Documenting a snapshot of your life & find beauty among the ordinary things in your day!
 
I have been participating in this since October 2008....so for the past 8 years, I have done 10 on 10 posts....Those are by far some of my Favorite posts!
You can see all my 10 on 10 posts HERE


I will say, that I miss really sitting down and writing like I did in some of those posts like "Relish Your Role",  "Yes, I am one of those moms" and "I was the BEST MOM EVER. Then I had kids" 
I love writing those types of posts....I really want to start writing like that every once in a while.

If you made it through this post...Thank You!
Can't wait to read some of your FAVORITE blog posts!

Read More..

Monday, June 5, 2017

Favorite Recipes Green Smoothies For More Energy Clarity!


About three months ago I discovered "Green Smoothies".  Bob and I and the children have enjoyed them daily withour breakfast ever since!  We have experienced so much more energy, satisfaction, and clarity in our days since we've been drinking green smoothies. Our chiropractic doctors at the Country Chiropractic Clinic here in Mount Vernon, WA, Dr.'s Avery, Nick, and Nathan Martin, gave us all of this great information I'll share with you!  I'll give you our personal favorite recipe, other recipe ideas that the Dr.'s gave me, and tell you why green smoothies are so amazing healthy for people - and so delicious! 

(I recently found these plastic, insulated cups from Wal-Mart with lids and straws for $4.65 each, to help prevent spills for the youngest 7 kids. *smile*)

According to Dr. Avery Martin, green smoothies are a combination of 40% green vegetable and 60% fruit, which is optimal for human consumption.  The ingredients are pureed in a blender, and unlike juices, green smoothies are a complete food because they still have fiber.  They're also far easier to prepare, and clean up, in a blender compared to a juicer.

Here was our family's first favorite recipe made in our "regular" Kitchen Aid blender.  It makes about 48 oz.  Bob and I would share one recipe giving us each about 24 oz.; our seven oldest children would share another recipe, giving them each about a 7 oz.

"Banana Blueberry Blast"
  • 1.5 cups fruit juice (100% juice) - (we use grape juice)
  • 2-3 large handfuls of spinach or other greens (we use 3 of spinach)
  • 2-3 bananas (we use 2)
  • 1 cup blueberries (we use frozen)
  • 1 cup water, added at the end
  • (ice cubes optional for icy taste - we don't include ice as the smoothie is then too cold for us to drink quickly)
My Steps:
  1. Measure the grape juice into the blender, then add the spinach and puree them.
  2. Add the bananas and berries and "chop", then puree the entire mixture. 
  3. Decrease the blender's speed to it's lowest which causes the liquid to recede enough to open the top pour spout in the lid of the blender and add in one cup of water.  This makes the smoothie less thick, more "liquidy", and easier for us to drink down quickly and easily, which we prefer (to save time).
* Tip:  I buy bags of organic, pre-washed spinach from Costco.  This way I can just open the bag in the morning and remove the handfuls we need; no washing or drying necessary.  It's also by far the best price there, and the freshest.  I've tried buying spinach from Wal-Mart, but after I washed and dried it the spinach just did not last more than a day or two before spoiling.  I don't think by using my salad spinner I could get the spinach as dry as it comes in the bag, and the water would then sit on the spinach and spoil it; plus I don't have time to wash and dry it every day.  And then I discovered that I can freeze spinach until I'm ready to use it!  This discovery enabled me to now purchase smoothie ingredients for our entire family because I don't need to fit it all in to our refrigerator; we store it in the freezer and then put it strait in to the blender.

Here is our current FAVORITE recipe - made in our new high-powered Blendtec blender (purchased used off of Craig's List!) - a recipe I got from GreenSmoothieGirl.com - one of THE most amazing, informational, encouraging, enabling, yummy sites I've ever seen.  Robyn Openshaw is transforming our family! 

Robyn's Green Smoothie  (and here's a video of her making the smoothie!)
  • 2 c. water
  • 2-3 Tbl. flax oil
  • 1/2 - 1 tsp. Stevia sweetener
  • 1-2 Kale leaves (with stocks)
  • Spinach to fill the blender 1.5x
  • 2 bananas
  • 2 apples
  • 1 c. blue berries or mixed berries
  • 3 strawberries
The steps:
  1. Add the water, oil, and sweetener to the blender.
  2. Add the kale, and then fill the blender with spinach, pressing it down a bit to pack it in, and puree it down to a liquid.  Then fill the blender with a bit more spinach and puree on a high speed for 90 sec. until the mixture is "liquidy" and reaches the 5 c. mark.
  3. Add the apples (I slice them in to quarters and add them seeds, core, and all), and one banana, then chop in the blender.
  4. Add the other banana and all the berries; chop a bit, then puree on a high speed for 90 sec. until creamy & smooth!
* I also purchased some disposable "milkshake straws" (purchased from our local kitchen outlet store, a package of 35 for $1.99, which we wash and re-use) that are extra-wide, which enables the kids to drink their smoothies more easily, quickly, and neatly.

Here are a couple other recommended recipes to try, from Dr. Avery:  (And, the Green Smoothie Girl has hundreds more recipes, too, that are delicious!)

"Orange Julius"
  • 1/2 cup orange juice concentrate
  • 3 cups water
  • 3 large handfuls of spinach leaves
  • splash of vanilla extract
  • (ice cubes optional for icy taste)

"Pear Perfection"
  • 2 dates (pitted)
  • 1.5 cups water
  • 2 bananas
  • 1 pear (cored, but not peeled)
  • 2-3 large handfuls greens
  • (ice cubes optional for icy taste)

Here's more about the value of green smoothies,

"Green smoothies are easy to digest.  When blended well, all the valuable nutrients in these fruits and veggies become homogenized, or divided in to such small particles that it becomes easy for the body to assimilate these nutrients; the green smoothies literally start to get absorbed in your mouth...
"By consuming two or three cups of green smoothies daily you will consume enough greens for the day to nourish your body, and they will be well assimilated.  Many people do not consume enough greens, even those who stay on a raw food diet.  The molecule of chlorophyll has only one atom that makes it different from a molecule of human blood.  According to the teachings of Dr. Ann Wigmore, to consume chlorophyll is like receiving a healthy blood transfusion."  ~ Dr. Avery Martin

Green smoothies are also very good for children and babies over the age of six months (but of course you have to be careful and slowly increase the amount of smoothies to avoid food allergies).   I encourage  our children to consume their smoothies quickly  so that they receive as much of the  nutrients as possible.

Here is more information on how to personalize green smoothies to perhaps even better fit your own personal preference for taste and texture, while maintaining the smoothie's nutritional quality.


Another recent tip I've discovered to make smoothies creamier and to add a good, healthy plant fat for brain development and satiation, is to add some canned coconut milk to the recipe! We add between 3/4-1 cup and my favorite brand is "Thai" in the Asian food section of the grocery store. It actually makes our smoothies taste like ice cream - oh my gosh - YUM. *cheer!* And our children absolutely love it; and I love knowing they're receiving a very good dose of "good fats".

If you're out and about and desire a yummy green smoothie, Dr. Avery says they can be made at any juice bar, restaurant or health food store.  I've also tried a drink displayed at Wal-Mart and Costco, called Naked Juice (don't be afraid *chuckle*), specifically the one called "Green Machine".  It is very similar to green smoothie juice, without the fiber - delicious and sweet, but has no sugar added!  It was perfect for when I desired a healthful snack and didn't want to succumb to the temptation of sugary drinks.   Being familiar with green smoothie drinks and knowing how yummy they really are despite their "greenness", my daughter and I just laughed out loud at the words printed on the side of the "Green Machine" Naked Juice.  It read something like this, 

"Looks weird.  (*sip*)
Tastes amazing!  (*sip-sip*)
...Still looks weird..."

Blessings on your health!


You  also might enjoy reading some of my related posts:
Recipe Organization
Large Family Meal Planning and Shopping
Favorite Recipes:  Irish Brown Bread


Read More..

Thursday, February 23, 2017

Favorite Recipes Homemade Chili


Serves 12
* Vegetarian modifications included

This is a family favorite for us and the children always cheer when I announce that we're having it. It's very flavorful, yet simple, inexpensive, healthy, is great to put on for company, or to bring to a friend in need. *smile* We love to serve it with shredded co-jack cheese, chopped onions, corn chips, and/or corn bread on the side.

This is a large recipe (already doubled), so if you have a smaller group you may want to cut it in half. Although, it is great to freeze and have on hand for later!

Ingredients:

  • 2 cans Black beans, rinsed
  • 2 cans Pinto beans, rinsed
  • 2 cans Red kidney beans, rinsed
  • 1 lb. ground beef or turkey, browned and drained
  • 1 onion, diced (or 2 tsp. onion powder), plus some to top chili with
  • 3 Tbl. Chili powder
  • 1/2 tsp. Black pepper, freshly ground
  • 2  15 oz. cans Tomato sauce
  • 2-3 c. Water
  • 4 cloves Garlic
  • 2 tsp. Cumin
  • 1 1/2 tsp. salt


Directions:

  • Combine all ingredients.
  • Heat to boiling, then simmer 40 minutes; or for crockpot may heat on low all day.
* Vegetarian Modifications:
  • Leave out the meat
  • Add 1 additional can each of black beans and pinto beans.


Blessings on your meal times!


You might also be interested in some other recipes:
Favorite Recipes - White Chili
Favorite Recipes - Daily Delicious Whole Wheat Bread
Favorite Recipes - Irish Brown Bread
Favorite Recipes - Vegetable Cheese Soup
Mom Tips - For Cooking, #1

Read More..

Saturday, September 10, 2016

Favorite Recipes Zucchini Cakes


(Recipe and photo courtesy of LifesAmbrosia.com, with a few of my own modifications)

This is a delicious vegetarian dish that our whole family really enjoys, served with Quinoa (similar to brown rice but has tons of protein), and sometimes with a dollop of ranch dressing.  They also make an elegant appetizer.  Our family of 11 eats a double recipe.

* Makes 15 cakes

Ingredients:
  • 1 large zucchini (1 to 1-1/2 lbs.), grated, excess water removed
  • 1/2 c. Parmesan cheese
  • 1-1/4 c. Panko bread crumbs (found at Wal-Mart in the baking aisle. These bread crumbs do not absorb moisture like typical American bread crumbs do; instead they stay crisp and crunchy).
  • 1/8 tsp. ground nutmeg (Note:  If you add too much it can quickly take over the taste).
  • 1/4 tsp. paprika
  • 2 cloves garlic, minced
  • 1 egg
  • 1/2 tsp. salt
  • 1/4 tsp. pepper
  • Olive oil, for frying on the griddle

Instructions:
To remove excess water from the zucchini, after you grate it put it into paper towels, or into a fine strainer with paper towels over it, and squeeze or press to release the water.  (When I use paper towels I use nearly an entire roll.)

Combine all ingredients, except olive oil, in a bowl and mix thoroughly.  Using a heaping tablespoon form the mixture in to hamburger-sized patties (thinner is crisper), really squishing them first into a ball to help them stick together before pressing flat.

Heat olive oil in a pan over medium heat, or a griddle at 350 degrees.  Once heated, add patties and cook until golden brown, about 3-4 minutes per side.  I like to heat a cookie sheet covered with foil in a 250 degree oven and place the done patties on it while I cook the rest of the patties, to keep the original batch warm until I've cooked them all.  (Do not place the patties in a covered baking dish, however, as they lose their crispness and turn soggy when enclosed - trust me, I know. *chuckle*)

Blessings on your family meal,

You might also enjoy my posts:
Favorite Recipes Irish Brown Bread
Favorite Recipes White Chili
Favorite Recipes Karen's Cobb Salad
Read More..